Replacing and Upgrading the WiFi Antennas in the Atari VCS 800

Atari, unfortunately, chose to include very short WiFi antennas in the VCS 800. And their placement, affixed to the top of the case, makes opening the case and working inside the system a challenge. Since these antenna are also used for Bluetooth, upgrading and enhancing them can be a real benefit. Chatter on the Atari VCS 800 Discord channel indicated, and in my case I can confirm, that these IPEX MHF4 2.4 & 5 GHz WiFi antennas1 are compatible with the Atari VCS 800.

At nearly 18 inches long, the IPEX WiFi antennas can offer better connectivity with WiFi and Bluetooth, and opportunities for qualify-of-life improvements when working on the Atari VCS 800 hardware. Rather attempt to route the antennas along the top of the case, but allowing for additional slack when opening it up, I decided to set my antennas to the bottom of the case and eliminate all issues with getting inside the VCS 800. This, of course, mean some additional up-front work, but it will hopefully pay off over time.
Step 1 – Remove the rubber feet from the bottom of the VCS 800 and set them aside.

Step 2 – Remove the front and rear panels from the VCS 800, remove the screws hidden by the rubber feet, and then set the system down with something in front it – but do not open the case until you read below!

Both front and rear panels snap on and off, but the ones on my system were pretty tight and I needed to use a butter knife to help pop them off. Then, take out the screws that were hidden by the rubber feet. Flip the system back over, and set it down – as it would sit normally – with something(s) stacked towards the front end of the Atari.
IMPORTANT: Do not lift the top half of the case from the bottom half going straight up, like the top half was a lid or cover!
The WiFi antennas in the Atari VCS 800 are extremely short and they are, unfortunately, attached to the top half of the case towards the front of the system. We want to replace the WiFi antennas, and do not want to break them off the WiFi card.
To avoid snapping the WiFi antennas, you will need to open the VCS 800 like a book or clamshell, from back-to-front, and where the front of the system is the hinge. I stacked several hardcover books on top of a cutting board, so that I was able to open the VCS 800 like an “L”, propping the top of the case against the books so I could access the WiFi card and remove it.
Step 3 – Unscrew and remove the WiFi Card from Slot J16

Step 4 – Disconnect the WiFi antenna from the WiFi Card and remove them from the top of the case

The antennas seat into the WiFi card, kind of like a push-in button on clothing or jacket, and will pop off of the WiFi Card without much effort. You can simply remove the old antennas and dispose of them.
Step 5 – Unscrew and remove the shielding from the motherboard

Step 6 – Disconnect the cables for the front USB ports from the motherboard plugs J55 and J56


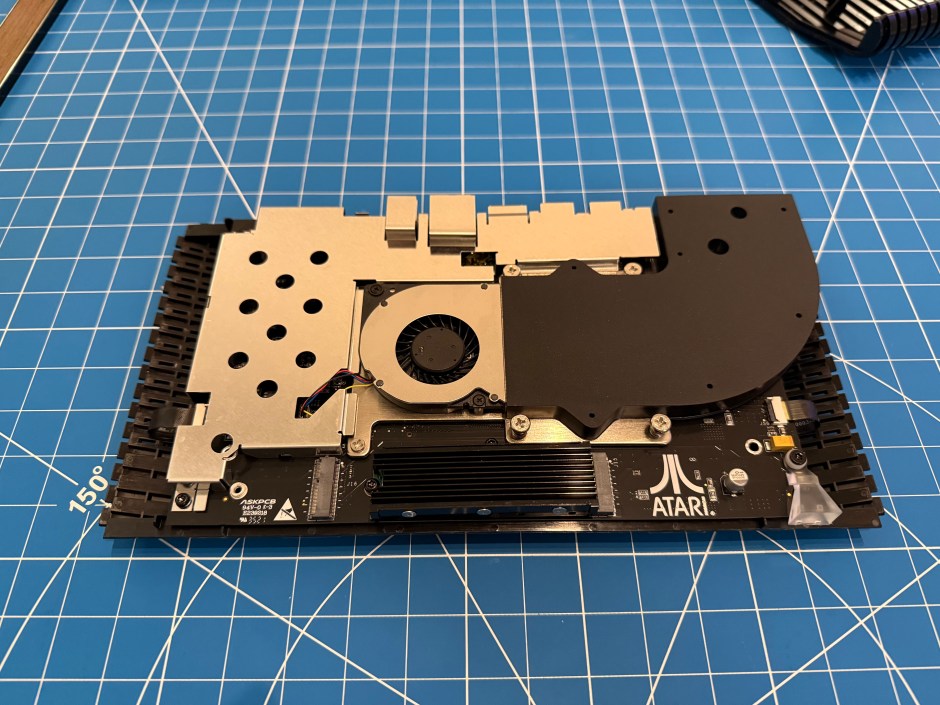
Step 7 – Unscrew and remove the motherboard, remove the bottom shielding, and set both aside

Step 8 – Affix and route the new WiFi cables along the bottom of the case

I’ve routed one cable around the front of the case, and one around the back. For both, I’ve tried to avoid blocking air intakes as much as possible, and used a little electrical tape to secure them.
Step 9 – Return the bottom shielding, screw the motherboard back into the bottom of the Atari VCS 800 case, reconnect the front USB ports to the motherboard plugs J55 and J56, and then reattach the top shielding

Don’t forget to reattach the USB front ports to the motherboard before reattaching the shielding, so you have the space needed to clamp the ribbon down with your finger.
Step 10 – Reconnect the WiFi Card to motherboard slot J16, screw it down, and connect the new WiFi antennas to the WiFi Card

Seating the antennas into the plugs is not easy. I had to break out the magnifying glasses I use when painting fine details on models to finally get them in. But I’m also 57, so your eyesight may be fine.
Step 11 – Screw the top and bottom of the Atari’s case together again, reattach the rubber feet, and snap the front and rear panels back onto the case

After upgrading and replacing the Atari VCS 800 WiFi antennas, I booted the system to Linux Mint and ran couple of speed tests; one while wired to Ethernet and one using the new WiFi antennas.


In my additional testing, both network performance and Bluetooth connections are rock solid, and are faster, more reliable, and cover a wider range. I am extremely pleased with these IPEX WiFi antennas2 and how they are working in the VCS 800. If you are looking for similar improvements for your Atari, I recommend checking them out!
If you are curious about upgrading the RAM or adding an SSD to your Atari VCS 800, or installing Linux Mint and Batocera on the system, there are guides for those projects as well.


